1.เข้าไปที่ C:\Program Files\Microsoft SQL Server\100\Setup Bootstrap\Release\x64 (ของผมใช้ win7 64 bit)
2. มองหาไฟล์ SetupARP.exe ดังภาพ
3.จากนั้นดับเบิลคลิกที่ไฟล์ดังกล่าว จะมี popup ให้เลือก ให้เลือก Remove จากนั้นก็ทำตามขั้นตอนที่ระบบเเนะนำเลยครับ
* หากเราได้ไป Uninstall จาก Control Panel\Programs and Features แล้วระบบจะ remove ไม่ได้ เราต้องไป เลือกที่ repair ก่อน
เมื่อเลือกเเล้วจากนั้น ระบบจะให้เลือกไฟล์ ก็ให้เราเลือกไฟล์ที่เราใช้ติดต้ังอ่ะนะครับ ระบบจะทำการซ่อมเเซม
จากนั้นก็รีสะตาทเครื่อง 1 ครั้ง ก็จะสามารถ remove sql server 2008 ได้
Credit : คุณ reekoong จากเว็ป http://www2.thaiadmin.org
อ้างอิง : https://www2.thaiadmin.org/board/index.php?topic=143605.0
การใช้ Laravel
Tuesday, June 4, 2019
Saturday, June 24, 2017
1.views->product->index.blade.php
----------------------------------------------------
@extends('layouts.product_layout')
@section('style')
<style>
th, td {
padding: 10px;
}
button {
padding: 5px 12px;
}
button a {
text-decoration: none;
}
</style>
@endsection
@section('contents')
<div>
<a href="/product/create">
<button>ADD</button>
</a>
</div>
<table border="1">
<thead>
<tr>
<th>ID</th>
<th>Product</th>
<th>Description</th>
<th>Price</th>
<th>Created at</th>
<th>Updated at</th>
<th>Action</th>
</tr>
</thead>
<tbody>
@foreach($products as $product)
<tr>
<td>{!! $product->id !!}</td>
<td>{!! $product->name !!}</td>
<td>{!! $product->description !!}</td>
<td>{!! number_format($product->price) !!}</td>
<td>{!! $product->created_at !!}</td>
<td>{!! $product->updated_at !!}</td>
<td>
<a href="/product/{!! $product->id !!}/edit">edit</a>
<a href="/product/{!! $product->id !!}/delete">delete</a>
</td>
</tr>
@endforeach
</tbody>
</table>
@endsection
------------------------------------------
Monday, January 11, 2016
การทำ Migrate Database
เปิด terminal พิม
php artisan migrate:install
ไปที่ Folder laravel ที่ต้องการสร้าง
cd /var/www/laravel/
พิมคำสั่ง
sudo php artisan migrate:make Create_table_use
use Illuminate\Database\Schema\Blueprint;
use Illuminate\Database\Migrations\Migration;
class CreateTableUser extends Migration {
/**
* Run the migrations.
*
* @return void
*/
public function up()
{
//
Schema::create('users', function($table)
{
$table->increments('id');
$table->string('fisrtname')->unique();
$table->string('lastname');
$table->string('email');
});
}
/**
* Reverse the migrations.
*
* @return void
*/
public function down()
{
//
Schema::drop('users');
}
}
php artisan migrate:install
ไปที่ Folder laravel ที่ต้องการสร้าง
cd /var/www/laravel/
พิมคำสั่ง
sudo php artisan migrate:make Create_table_use
เปิดไฟล์ที่อยู่ใน /var/www/laravel/app/database/migrations/
ทำการแก้ไขไฟล์
<?php
use Illuminate\Database\Schema\Blueprint;
use Illuminate\Database\Migrations\Migration;
class CreateTableUser extends Migration {
/**
* Run the migrations.
*
* @return void
*/
public function up()
{
//
Schema::create('users', function($table)
{
$table->increments('id');
$table->string('fisrtname')->unique();
$table->string('lastname');
$table->string('email');
});
}
/**
* Reverse the migrations.
*
* @return void
*/
public function down()
{
//
Schema::drop('users');
}
}
การใช้งาน Sentry กับ laravel 4
1.ติดตั้ง Sentry
เปิดไฟล์ composer.json ที่อยู่ในโฟเดอร์ laravel
ให้ทำการแก้ไขและเพิ่มคำสั่งไว้ใน "require" ดังคำสั่งข้างล่างนี้
"require": {
"laravel/framework": "4.2.*",
"cartalyst/sentry": "2.1.*"
},
จากนั้นทำการ อัพเดด composersudo composer update
ถ้าขึ้นแบบนี้แสดงว่า install ผ่าน
2. ติดต่อ กับ Database
แก้ไขไฟล var/www/laravel/app/config/app.php
ไปที่ 'providers' => array( แล้วทำการเพิ่มคำสั่งนี้ไว้ในบรรทัดสุดท้าย
'Cartalyst\Sentry\SentryServiceProvider',
เลื่อนลงมาที่ 'aliases' => array( แล้วทำการเพิ่มคำสั่งข้างล่างไว้ในบรรทัดสุด้ทาย
'Sentry' => 'Cartalyst\Sentry\Facades\Laravel\Sentry',
แก้ไขไฟล์ /var/www/laravel/app/config/database.php
ให้ตรงกับ Database ที่จะเชื่อมต่อ
'mysql' => array(
'driver' => 'mysql',
'host' => 'localhost',
'database' => 'test_create01',
'username' => 'root',
'password' => '1234',
'charset' => 'utf8',
'collation' => 'utf8_unicode_ci',
'prefix' => '',
),
จากนั้นทำการ Migrate Database
http://cnexplus.blogspot.com/2016/01/migrate-database_11.html
ทำการเปิด terminal และไปยังที่เก็บไฟล์ของ laravel โดยใช้คำสั่ง
cd /var/www/laravel/
ทำการ migrate ไฟล์ออกมา
sudo php artisan migrate --package=cartalyst/sentry
ทำการ config ไฟล์
sudo php artisan config:publish cartalyst/sentr
*(ถ้าไม่ขึ้นพิมคำสั่งข้างบนอีกครัง)
เข้าไปดูใน Database (http://localhost/phpmyadmin/) จะได้ table ดังนี้
การสร้างฟอร์ม Login / Register (Laravel4)(Ubuntu4)
การสร้างฟอร์ม Login / Register
****ก่อนการสร้างฟอร์มต้องทำการสร้าง database และมี table แล้ว หากยังไม่ได้ทำสามารถศึกษาได้จาก
การสร้างdatabase และ การสร้าง table
1. ทำการเปิดไฟล์ HomeController.php ที่อยู่ใน /var/www/laravel/app/controllers/ เพื่อแก้ไข
ดังนี้
<?php
class HomeController extends BaseController {
/*
|--------------------------------------------------------------------------
| Default Home Controller
|--------------------------------------------------------------------------
|
| You may wish to use controllers instead of, or in addition to, Closure
| based routes. That's great! Here is an example controller method to
| get you started. To route to this controller, just add the route:
|
| Route::get('/', 'HomeController@showWelcome');
|
*/
public function showWelcome()
{
return View::make('hello');
}
public function getRegister()
{
return View::make('home.register');
}
public function getLogin()
{
return View::make('home.login');
}
public function postRegister()
{
try
{
$user = Sentry::createUser(array(
'first_name' => Input::get('first_name'),
'last_name' => Input::get('last_name'),
'email' => Input::get('email'),
'password' => Input::get('password'),
'activated' => true,
));
}
catch (Cartalyst\Sentry\Users\UserExistsException $e)
{
echo 'User Already Exists';
}
}
public function postLogin()
{
$credentials = array(
'email' => Input::get('email'),
'password' => Input::get('password'),
);
try{
$user = Sentry::authenticate($credentials, false);
if($user)
{
return Redirect::to('admin');
}
}
catch (\Exception $e)
{
return Redirect::to('login')->withErrors(array('login' => $e->getMessages()));
}
}
public function logout()
{
Sentry::logout();
return Redirect::to('/');
}
}
2. ทำการสร้างหน้า Login / Register
โดยทำการ New folder ที่ /var/www/laravel/app/views/
ชื่อ folder ว่า layouts
ทำการสร้างไฟล์ ขึ้นมาชื่อ
default.blade.php
ทำการเพิ่ม code ลงไป ดังนี้
<!doctype html>
<html lang="en">
<head>
<meta charset="UTF-8">
<title></title>
{{ HTML::style('//netdna.bootstrapcdn.com/bootstrap/3.1.1/css/bootstrap.min.css') }}
</head>
<body>
@yield('content')
{{ HTML::script('//ajax.googleapis.com/ajax/libs/jquery/1.11.0/jquery.min.js') }}
{{ HTML::script('//netdna.bootstrapcdn.com/bootstrap/3.1.1/js/bootstrap.min.js') }}
</body>
</html>
ดังภาพที่ 1.1
ชื่อ Folder ว่า home และทำการส้รางไฟล์ใหม่ขึ้นมาชื่อว่า login.blade.php
ภาพที่ 1.1
3. สร้าง file login
โดยสร้าง Folder ใหม่ ไว้ใน /var/www/laravel/app/views/ชื่อ Folder ว่า home และทำการส้รางไฟล์ใหม่ขึ้นมาชื่อว่า login.blade.php
ทำการเพิ่ม code ลงไป ดังนี้
@extends('layouts.default')
@section('content')
<div class="col-md-4 col-md-offset-4">
<div class="panel panel-info">
<div class="panel-heading">Please Login</div>
<div class="panel-body">
{{ Form::open(array('url' => 'login')) }}
@if($errors->has('login'))
<div class="alert alert-danger">
<a href="#" class="close" data-dismiss="alert">×</a>
{{ $errors->first('login', ':message') }}
</div>
@endif
<div class="form-group">
{{ Form::label('email', 'Email Address') }}
{{ Form::text('email', '', array('class' => 'form-control', 'placeholder' => 'Email Address')) }}
</div>
<div class="form-group">
{{ Form::label('password', 'Password') }}
{{ Form::password('password', array('class' => 'form-control', 'placeholder' => 'Password')) }}
</div>
<div class="form-group">
{{ Form::submit('Login', array('class' => 'btn btn-success')) }}
{{ HTML::link('/', 'Cancel', array('class' => 'btn btn-danger')) }}
</div>
{{ Form::close() }}
</div>
</div>
</div>
ดังภาพที่ 1.2
Route::post('login', 'HomeController@postLogin');
Route::post('register', 'HomeController@postRegister');
Route::group(array('before' => 'auth'), function(){
Route::get('admin', 'AdminController@index');
Route::get('logout', 'HomeController@logout');
});ดังภาพที่ 1.4
ทำการส้รางไฟล์ใหม่ โดยใช้ชื่อว่า index.blade.php
ภาพที่ 1.2
4. ทำการเพิ่ม Register ไว้ในที่เดียวกันโดยใช้ชื่อ register.blade.php โดยเพิ่ม code ลงไป ดังนี้
@extends('layouts.default')
@section('content')
<div class="col-md-4 col-md-offset-4">
<div class="panel panel-info">
<div class="panel-heading">Please Register</div>
<div class="panel-body">
{{ Form::open(array('url' => 'register')) }}
@if($errors->any())
<div class="alert alert-danger">
<a href="#" class="close" data-dismiss="alert">×</a>
{{ implode('', $errors->all('<li class="error">:message</li>')) }}
</div>
@endif
<div class="form-group">
{{ Form::label('fname', 'First Name') }}
{{ Form::text('first_name', '', array('class' => 'form-control', 'placeholder' => 'First Name')) }}
</div>
<div class="form-group">
{{ Form::label('last_name', 'Last Name') }}
{{ Form::text('last_name', '', array('class' => 'form-control', 'placeholder' => 'Last Name')) }}
</div>
<div class="form-group">
{{ Form::label('email', 'Email Address') }}
{{ Form::text('email', '', array('class' => 'form-control', 'placeholder' => 'Email Address')) }}
</div>
<div class="form-group">
{{ Form::label('password', 'Password') }}
{{ Form::password('password', array('class' => 'form-control', 'placeholder' => 'Password')) }}
</div>
<div class="form-group">
{{ Form::submit('Register', array('class' => 'btn btn-success')) }}
{{ HTML::link('/', 'Cancel', array('class' => 'btn btn-danger')) }}
</div>
{{ Form::close() }}
</div>
</div>
</div>
@stop
จะได้ดังภาพที่ 1.3
ภาพที่ 1,3
5. หลังจากนั้น ทำการแก้ไขไฟล์ routes.php ซึ่งอยู่ใน /var/www/laravel/app/
โดยเพิ่ม code ลงไปในบรรทัดสุดท้ายของหน้าดังนี้
Route::get('register', 'HomeController@getRegister');
Route::get('login', 'HomeController@getLogin');Route::post('login', 'HomeController@postLogin');
Route::post('register', 'HomeController@postRegister');
Route::group(array('before' => 'auth'), function(){
Route::get('admin', 'AdminController@index');
Route::get('logout', 'HomeController@logout');
});ดังภาพที่ 1.4
ภาพที่ 1.4
6. จากนั้น ทำการแก้ไขไฟล์ fifters.php ซึ่งอยู่ใน /var/www/laravel/app/
โดยนำ code ดังนี้ ไปวางทับ code เดิม
<?php
/*
|--------------------------------------------------------------------------
| Application & Route Filters
|--------------------------------------------------------------------------
|
| Below you will find the "before" and "after" events for the application
| which may be used to do any work before or after a request into your
| application. Here you may also register your custom route filters.
|
*/
App::before(function($request)
{
//
});
App::after(function($request, $response)
{
//
});
/*
|--------------------------------------------------------------------------
| Authentication Filters
|--------------------------------------------------------------------------
|
| The following filters are used to verify that the user of the current
| session is logged into this application. The "basic" filter easily
| integrates HTTP Basic authentication for quick, simple checking.
|
*/
// Route::filter('auth', function()
// {
// if (Auth::guest()) return Redirect::guest('login');
// });
Route::filter('auth', function(){
if(!Sentry::check()) return Redirect::guest('login');
});
Route::filter('auth.basic', function()
{
return Auth::basic();
});
/*
|--------------------------------------------------------------------------
| Guest Filter
|--------------------------------------------------------------------------
|
| The "guest" filter is the counterpart of the authentication filters as
| it simply checks that the current user is not logged in. A redirect
| response will be issued if they are, which you may freely change.
|
*/
Route::filter('guest', function()
{
if (Auth::check()) return Redirect::to('/');
});
/*
|--------------------------------------------------------------------------
| CSRF Protection Filter
|--------------------------------------------------------------------------
|
| The CSRF filter is responsible for protecting your application against
| cross-site request forgery attacks. If this special token in a user
| session does not match the one given in this request, we'll bail.
|
*/
Route::filter('csrf', function()
{
if (Session::token() != Input::get('_token'))
{
throw new Illuminate\Session\TokenMismatchException;
}
});
/*
|--------------------------------------------------------------------------
| Application & Route Filters
|--------------------------------------------------------------------------
|
| Below you will find the "before" and "after" events for the application
| which may be used to do any work before or after a request into your
| application. Here you may also register your custom route filters.
|
*/
App::before(function($request)
{
//
});
App::after(function($request, $response)
{
//
});
/*
|--------------------------------------------------------------------------
| Authentication Filters
|--------------------------------------------------------------------------
|
| The following filters are used to verify that the user of the current
| session is logged into this application. The "basic" filter easily
| integrates HTTP Basic authentication for quick, simple checking.
|
*/
// Route::filter('auth', function()
// {
// if (Auth::guest()) return Redirect::guest('login');
// });
Route::filter('auth', function(){
if(!Sentry::check()) return Redirect::guest('login');
});
Route::filter('auth.basic', function()
{
return Auth::basic();
});
/*
|--------------------------------------------------------------------------
| Guest Filter
|--------------------------------------------------------------------------
|
| The "guest" filter is the counterpart of the authentication filters as
| it simply checks that the current user is not logged in. A redirect
| response will be issued if they are, which you may freely change.
|
*/
Route::filter('guest', function()
{
if (Auth::check()) return Redirect::to('/');
});
/*
|--------------------------------------------------------------------------
| CSRF Protection Filter
|--------------------------------------------------------------------------
|
| The CSRF filter is responsible for protecting your application against
| cross-site request forgery attacks. If this special token in a user
| session does not match the one given in this request, we'll bail.
|
*/
Route::filter('csrf', function()
{
if (Session::token() != Input::get('_token'))
{
throw new Illuminate\Session\TokenMismatchException;
}
});
7. จากนั้นสร้าง Folder ใหม่ ไว้ใน /var/www/laravel/app/views/
ชื่อ Folder ว่า admin ทำการส้รางไฟล์ใหม่ โดยใช้ชื่อว่า index.blade.php
@extends('layouts.default')
@section('content')
<h2>Admin Section</h2>
{{ HTML::link('logout', 'Logout', array('class' => 'btn btn-warning'))}}
@stop
@section('content')
<h2>Admin Section</h2>
{{ HTML::link('logout', 'Logout', array('class' => 'btn btn-warning'))}}
@stop
8. ทำการสร้างไฟล์ชื่อว่า AdminController.php ไว้ใน /var/www/laravel/app/controller.php โดย เพิ่ม code ดังนี้
<?php
class AdminController extends BaseController {
/**
* Display a listing of the resource.
*
* @return Response
*/
public function index()
{
return View::make('admin.index');
}
/**
* Show the form for creating a new resource.
*
* @return Response
*/
public function create()
{
return View::make('admins.create');
}
/**
* Store a newly created resource in storage.
*
* @return Response
*/
public function store()
{
//
}
/**
* Display the specified resource.
*
* @param int $id
* @return Response
*/
public function show($id)
{
return View::make('admins.show');
}
/**
* Show the form for editing the specified resource.
*
* @param int $id
* @return Response
*/
public function edit($id)
{
return View::make('admins.edit');
}
/**
* Update the specified resource in storage.
*
* @param int $id
* @return Response
*/
public function update($id)
{
//
}
/**
* Remove the specified resource from storage.
*
* @param int $id
* @return Response
*/
public function destroy($id)
{
//
}
}
สามารถใช้งานได้โดยเข้าไปที่
Url Login : localhost/login
Url Register : localhost/register
Url Login : localhost/login
Url Register : localhost/register
**หากไม่สามารถเข้าได้ ให้ตรวจสอบดูว่า ติด permission หรือไม่
คำสั่งปลด permission คือ sudo chmod -R 777 ชื่อโฟลเดอร์/
เช่น sudo chmod -R 777 laravel/
การทำ Migrate Table database
การทำ Migrate Table database บน Ubuntu4 by Terminal
****ก่อนการสร้างTable ต้องสร้าง database ก่อน หากยังไม่ได้สร้างสามารถศึกษาได้จาก http://cnexplus.blogspot.com/2016/01/migrate-database.html
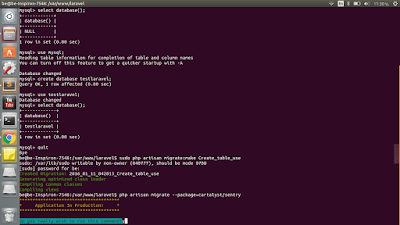
1. ทำการไป Folder ที่ต้องการสร้างโดยใช้คำสั่ง cd /var/www/laravel/ หากเข้าไปแล้วให้พิมพ์ sudo php artisan migrate:make Create_table_use ดังภาพที่ 1.1,1.2
ทำการแก้ไขจาก
<?php
use Illuminate\Database\Schema\Blueprint;
use Illuminate\Database\Migrations\Migration;
class CreateTableUser extends Migration {
/**
* Run the migrations.
*
* @return void
*/
public function up()
{
//
}
/**
* Reverse the migrations.
*
* @return void
*/
public function down()
{
//
}
}
เป็น
<?php
use Illuminate\Database\Schema\Blueprint;
use Illuminate\Database\Migrations\Migration;
class CreateTableUser extends Migration {
/**
* Run the migrations.
*
* @return void
*/
public function up()
{
//
Schema::create('users', function($table)
{
$table->increments('id');
$table->string('fisrtname')->unique();
$table->string('lastname');
$table->string('email');
});
}
/**
* Reverse the migrations.
*
* @return void
*/
public function down()
{
//
Schema::drop('users');
}
}
ดังภาพที่ 1.2
****ก่อนการสร้างTable ต้องสร้าง database ก่อน หากยังไม่ได้สร้างสามารถศึกษาได้จาก http://cnexplus.blogspot.com/2016/01/migrate-database.html
1. ทำการไป Folder ที่ต้องการสร้างโดยใช้คำสั่ง cd /var/www/laravel/ หากเข้าไปแล้วให้พิมพ์ sudo php artisan migrate:make Create_table_use ดังภาพที่ 1.1,1.2
ภาพที่ 1.1
จากนั้นไปทำการเปิดไฟล์ที่ได้ ซึ่งอยู่ใน /var/www/laravel/app/database/migrations/...
ทำการแก้ไขจาก
<?php
use Illuminate\Database\Schema\Blueprint;
use Illuminate\Database\Migrations\Migration;
class CreateTableUser extends Migration {
/**
* Run the migrations.
*
* @return void
*/
public function up()
{
//
}
/**
* Reverse the migrations.
*
* @return void
*/
public function down()
{
//
}
}
เป็น
<?php
use Illuminate\Database\Schema\Blueprint;
use Illuminate\Database\Migrations\Migration;
class CreateTableUser extends Migration {
/**
* Run the migrations.
*
* @return void
*/
public function up()
{
//
Schema::create('users', function($table)
{
$table->increments('id');
$table->string('fisrtname')->unique();
$table->string('lastname');
$table->string('email');
});
}
/**
* Reverse the migrations.
*
* @return void
*/
public function down()
{
//
Schema::drop('users');
}
}
ดังภาพที่ 1.2
ภาพที่ 1.2
2. เมื่อทำการแก้ไขแล้วให้เปิดไฟล์ database.php ซึ่งอยู่ ใน/var/www/laravel/app/config/database.php เพื่อทำการ configเมื่อเปิดแล้วให้ทำการแก้ไขให้ตรงกับ Database ของเรา
'mysql' => array(
'driver' => 'mysql',
'host' => 'localhost',
'database' => 'testlaravel',
'username' => 'root',
'password' => '12345',
'charset' => 'utf8',
'collation' => 'utf8_unicode_ci',
'prefix' => '',
),
'driver' => 'mysql',
'host' => 'localhost',
'database' => 'testlaravel',
'username' => 'root',
'password' => '12345',
'charset' => 'utf8',
'collation' => 'utf8_unicode_ci',
'prefix' => '',
),
ดังภาพที่ 1.3
ภาพที่ 1.3
3. เมื่อเสร็จแล้วให้กลับไปที่ Terminal อยู่จะอยู่ที่ /var/www/laravel แล้วพิมพ์ php artisan migrate --package=cartalyst/sentry เพื่อทำการ migrate ไฟล์ออกมา จะได้้ผลลัพธ์ดังภาพ 1.4 , 1.5
ภาพที่ 1.4
ภาพที่ 1.5
4. เมื่อทำการ migrateแล้ว ให้พิมพ์ php artisan config:publish cartalyst/sentry เพื่อทำการ config ไฟล์ ดังภาพที่ 1.6 , 1.7
ภาพที่ 1.6
ภาพที่ 1.7
5. เมื่อทำการ migrate แล้วจะได้ table ใน database ตามภาพที่ 1.8
ภาพที่ 1.8
============================END=============================
การทำ migrate database
การทำ migrate database บน ubuntu 4
1. เปิดโปรแกรม Terminal
พิมพ์ mysql -u ...ชื่อ.... -h ....ชื่อ localhost.... -p ลงไปใน Terminal ตัวอย่างเช่น
(mysql -u root -h localhost -p) เมื่อกด Enter ลงไปแล้วโปรแกรมจะให้ใส่รหัส ผ่านของ database จะได้ตามภาพ 1.1
1. เปิดโปรแกรม Terminal
พิมพ์ mysql -u ...ชื่อ.... -h ....ชื่อ localhost.... -p ลงไปใน Terminal ตัวอย่างเช่น
(mysql -u root -h localhost -p) เมื่อกด Enter ลงไปแล้วโปรแกรมจะให้ใส่รหัส ผ่านของ database จะได้ตามภาพ 1.1
ภาพ 1.1
2. เมื่อทำตามขั้นตอนที่ 1 แล้วให้พิมพ์ select database เพื่อดูว่าเรากำลังเลือกdatabase ตัวใดอยู่ หากยังไม่ได้เลือกหรือยังไม่มีฐานข้อมูลจะขึ้นดังภาพ 1.2
ภาพ 1.2
3. ทำการสร้าง database โดยพิมพ์คำสั่ง create database ชื่อdatabase; เช่น create database testlaravel; ดังภาพ1.3
ภาพที่ 1.3
4. เลือกใช้ database ที่เราได้ทำการสร้างจากข้อที่ 3 โดยใช้คำสั่ง use ชื่อdatabase; เช่น use testlaravel; ดังภาพที่ 1.4
ภาพที่ 1.4
5. พิมพ์ select database(); หากทำมาถึงขั้นตอนนี้แล้วถ้าทำถูกต้องจะขึ้นดังภาพที่ 1.5
ภาพที่ 1.5
6. พิมพ์คำสั่ง quit เพื่อออกจากการสร้าง database หากสร้าง database สำเร็จ database จะถูกสร้างใน localhost/phpmyadmin ในที่นี้ได้สร้างdatabase ชื่อว่า testlaravel จะแสดงดังภาพที่ 1.6
ภาพที่ 1.6
==============================The End****==============================
Subscribe to:
Posts (Atom)